


(Tutorial no.2 . Come and visit again next week for no.3 of 11)
I'm excited about today's post. It was done by a good friend. I will be ever grateful that our paths crossed while we were both passing through Korea. She has a blog called Ovenless Chef, and not only is she a great cook and mom but also a super inventive crafter (she will deny this.)
I'm excited about today's post. It was done by a good friend. I will be ever grateful that our paths crossed while we were both passing through Korea. She has a blog called Ovenless Chef, and not only is she a great cook and mom but also a super inventive crafter (she will deny this.)
Over to her:
“Monster Mittens”
What you are about to witness may be a little scary for regular
crafters/creators…
Step into my laboratory… aka bustling household with two boys (a
four year old and a four month old) and my big boy, lovingly referred to as my
husband.
I typically stick to the food blogging over at Ovenless Chef, but every now and then I
stray into the sewing/crocheting arena of creative talents and pretend that I
am as good as Gabi here on Bee-inspired and well… I am an amateur
wanna-be, beginner. That is all. So don’t judge.

Today, I am going to attempt to walk you through making your very own pair of monster mittens for your little bundle of joy… or for a gift. I am sure you have all seen those squares of super soft, must rub your face against, fabric that has loops of ribbon protruding from the sides. They go by the name of “taggies, lappies, softies.” I am not sure they have an official name, but the idea behind them is tactile sensory development of sorts for babies. While these are well and good to have around, it is just one more thing to pick up and wash. My solution… combine these “lappies” with mittens and have a multi-function toy/clothing… which if you have ever had a baby and tried to hold the child down while trying to clip the itsy bitsy fingernails and not cut the itsy bitsy fingers in the process whilst the baby screams all because you don’t want your baby looking like scar face from the self inflicted scratches these razor like fingernails can inflict on the oh-so-fragile skin… well, let’s just say, mittens are your best friends. Or socks. But let’s face it, people without kids give you “that look” when they see you out in public with socks stuck on your kids hands. SO… invest in mittens, or better yet... make these! Oh… they are called monster mittens because they look like little monster hands once the baby has them on, plus it sounds better than “Lappie Mittens, Taggie Mittens, or Softie Mittens.”
The great thing about this project is that you can recycle a piece
of old clothing. I used an old pair of sweatpants for one pair and a too-small
t-shirt for another. Okay, I know, enough chit-chat, here we go.

Step 1: Cut out your mittens. Cut 4 squares measuring 11cm (4 ¼
in) X 13cm (5 in). Cut gentle curves on one end of each the mittens along the
11cm side. This will give you a U-shape. These measurements include 1 cm seam
allowances. (The pins in the picture were placed there simply to hold two
pieces of fabric together so that I only had to make two cuts.)

Step 2: Cut several 5 cm (2in) strips of ribbon. There is no
magical number for this, just use as many as you’d like per hand and as many
colors as you’d like.

Step 3: Fold the ribbons in half and pin around the top curve with
the fold facing in toward the center of the mitten on the side of the fabric
you want to be the exterior side. Be sure to let the ribbon ends hang over the
edge to reduce fraying once they are sewn into place. Don’t pin any loops on
the bottom 4cm (2in) to make allowance for the elastic banding/hemming.

Step 4: Now pin the other half of the mitten in place with the
side you want facing out on the inside. (Once you have the mitten pinned, it
will look like an inside-out mitten)

Step 5: Sew both mittens leaving
the flat side on each mitten open. I would suggest back-stitching over each of
the ribbons as you sew, just for extra durability. You should now have two
mittens with a u-shape seam and an open end.

Step 6: Time to make the casing to house the elastic band that
will hold these cute lil’ mittens on those cute lil’ babies hands. So flip the
open ends up and pin in place with about 2cm (1 in) of fabric folded over. You
can go ahead and trim the ribbon at this point too… just to keep things tidy
inside the mittens and to keep them from possibly fraying and getting caught on
little fingers after a few times of washing and wearing.

Step 7: Sew the flap/hem in place, leaving a 1 cm ( ½ in) opening
to thread the elastic through. (See picture) *** IMPORTANT… be sure to
backstitch at the beginning and end of your seam. This will make the mitten
more durable as well as giving you the option to not have to mess with closing
the seam once the elastic is in place. (Trust me, you will thank me when you
try to stretch the elastic and sew up the hole later… which is not really
necessary if you backstitch like I tell you to here… you’ll see.) I put my hole
over a side seam so it would be less noticeable.
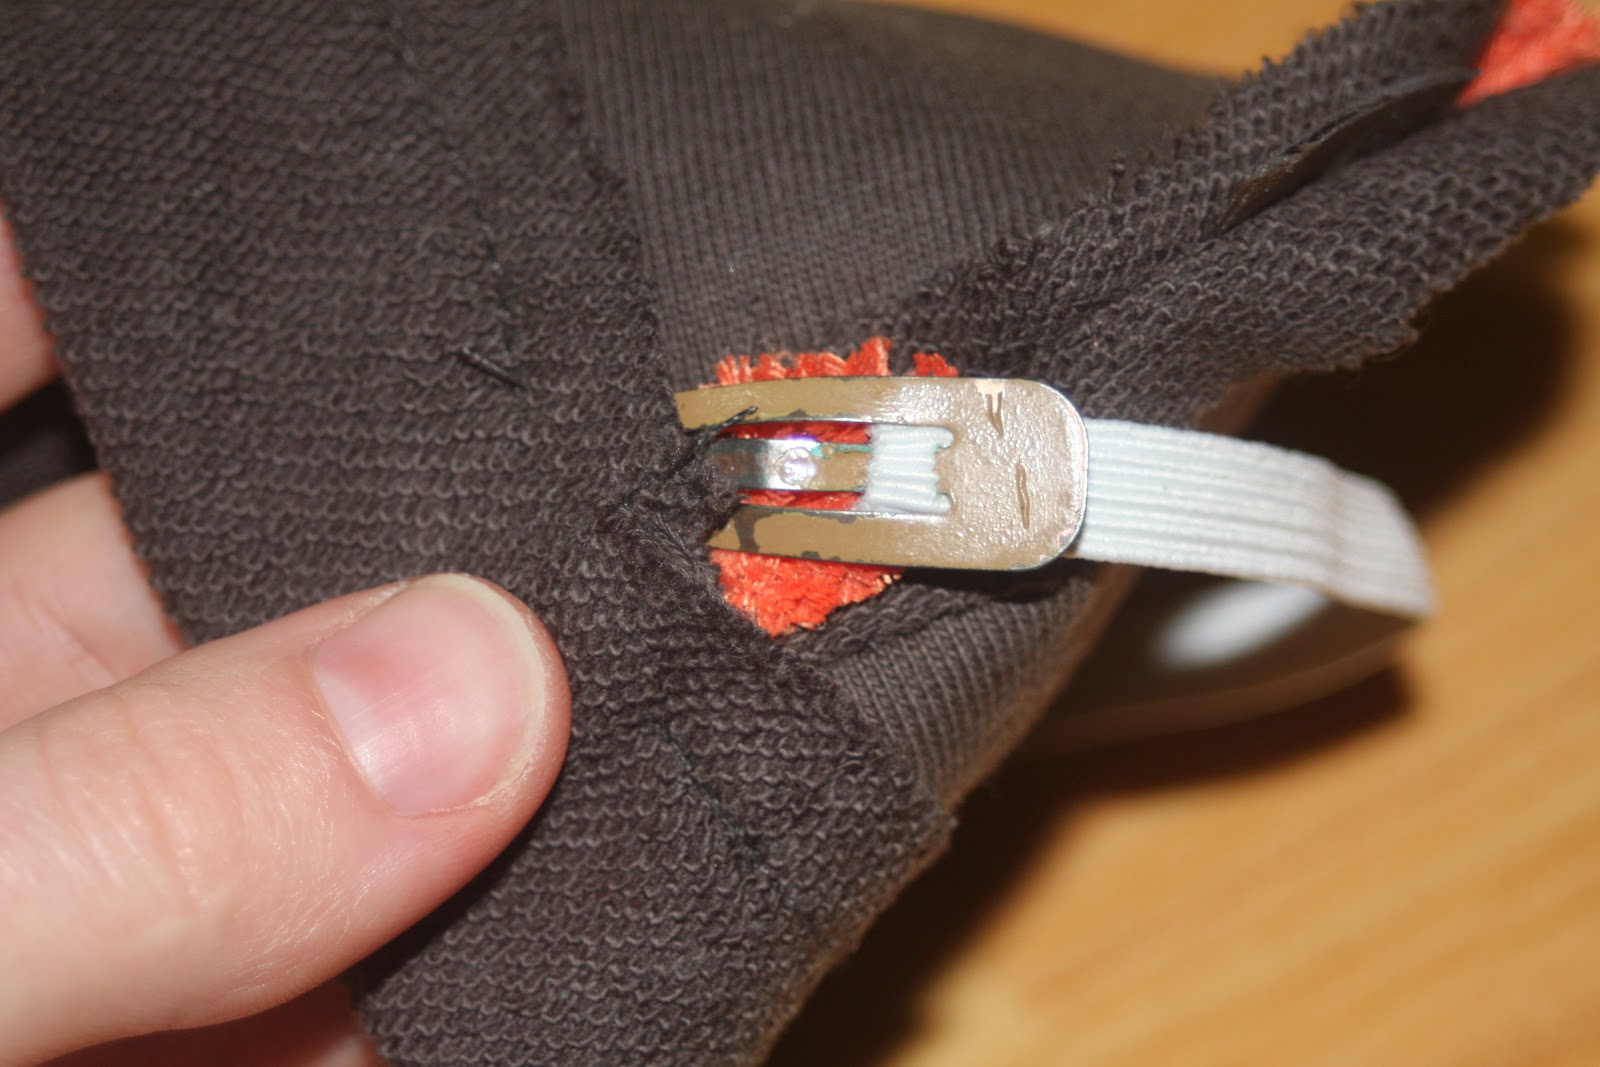
Step 8: Cut two elastic strips measuring 14cm (5 ½ in) each, and
thread them through the hems using a safety pin. ( Or if you are ghetto like me
and don’t have one, a small hair clip inserted into a tiny slit in the band…
don’t judge. )


Once you get the elastic started into the hem, I would suggest
pinning the loose end to the mitten to keep it from disappearing into the
mitten and losing it forever.


After you pull the safety pin end out, pin the two ends of elastic
together until ready to sew.

Step 9: Pinching the ends of the elastic together, and keeping
your fingers clear of the machine needle, manually turn the wheel to insert the
needle into the elastic about 1 cm ( ½ in) from the ends (this just helps to
keep your fingers safe and the elastic from slipping once you use the foot
pedal to sew the seam).


Sew back and forth several times to create a sturdy seam. Once
sewn, simply tuck the elastic tails into the hole.
.jpg)
Step 10: This is where you can simply turn the mittens inside out
and they are wear ready! Of course, if you are a stickler for details, feel
free to attempt the circus act of stretching the elastic out and flattening the
fabric to sew up the hole in the seam with only two hands… not to mention
getting the mitten under the foot and in place to sew. This is where you thank
me for telling you to back-stitch earlier in the tutorial. The finishing of the
seam is purely decorative at this point. Also… if you find that you need a
larger or smaller band for your baby’s wrists, the open hole allows for an easy
fix here.
You are done. Turn those bad boys inside out, and be proud of your
monster mittens!

3 comments:
Question...when your child has these on his hands how does he play with the elastic or ribbon loops? Just wondering...
My kid definitely shoved them in his mouth and fully enjoyed soaking each and every "monster finger"
Oh, and I wouldn't recommend elastic for the loops...just in case it stretches and snaps the little one :/
Post a Comment