Thursday, August 29, 2013

Fabric fabric fabric!!

I'm so excited!! 
Recently a friend of mine taught me how to use a design program and enabled me to do something that I have been interested in for a while... design fabric!
I have been doing a bit of screen printing research as well and so I took the liberty of screen printing my new design and I LOVE IT!!
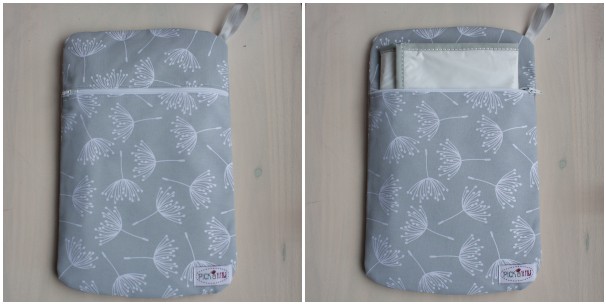
My design is called Dandelion Wisps (I feel super fancy now that I've named it.) I did it in grey and mint.

Here is what I made with my new fabric: 


They are diaper (nappy) changing bags for your purse or diaper bag (so that you don't need to lug a huge bag into the changing rooms every time you go on an outing.)

Being able to design my own fabric (although I'm still on super beginner phase) has caused my creative mind to get so fired up that it exploded and left a pretty rainbow splatter on my wall. 

Sometimes small children get so excited that their excitement bursts out in a squeal. 
I can totally relate right now.

Yaaaaaaaaaaaaaaaaaaaaaaay!!

Blessings


Tuesday, May 21, 2013

DIY cake stands

My beautiful sister-in-law got married recently, and I made some decor for her bridal shower.

A dilemma that I had was a lack of cake stands. 
Seeing as I believe that most things are DIY-able, I made some. 
 Here is what you need: 
 (I always seem to forget things out of these photos, but you get the idea)

A cardboard box
Glue (I used "no-more-nails" but wood glue works too)
A can of food of preferred height
Pretty paper (I used two sheets of scrapbooking paper per stand)
A border punch
Scissors, Pencil, Ruler
Double sided tape 

1. Cut a circle out of the cardboard box. I used a big bowl as a "template". Make sure that it is not too big otherwise the stand won't be stable enough to hold the cake/cupcakes. 
2. Make sure that you leave enough space for the top of your cake stand then cut strips of paper from the rest. I made my strips approx three and a half centimeters (1.4inches). The size of the cake stand top is going to determine how many strips you will need. I needed 2 and a teeny bit. 

3. Use the border punch to make the edges pretty.
4. Stick double sided tape to the ends of the strips and stick then together to make one long strip. 
5. Place glue (sorry I forgot to take that photo) all around the edge of the cardboard and then stick the long strip to the edge. Making sure the flat edge of the strip is level with the table (you should be doing this on newspaper - I just removed it for the photo, but for some reason, that I can't remember now, I seemed to have left my scissors in there as a model...)
6. Place it on the can/extra can to dry.
7. Take the can and measure its length, roll it along the paper as you measure it to make sure there is enough paper to go all the way around.
8. Cut it out and place double sided tape on the edges as well as on the top and bottom of the can. (if you look veeeery carefully you can see my double sided tape on the can)
9. Stick the paper to the can.
 10.Place the top of the cake stand on your scrapbooking paper and trace around it (it is okay if you leave a bit of an edge, rather too much than too little)
11. Cut it out and stick double sided tape to the paper or cardboard, which ever you prefer. 
12. Stick the paper on to the cardboard and use your scissors to trim the edges. 
13. Put some glue on the bottom of the cake stand top, where you will be placing your can. Be very generous. 
14. Place your can on the glue and put something heavy on top while the glue dries. 

repeat steps 1-14 as many times as you wish. 
and..
TA DA!!
This should have been a photo of pretty treats in a beautifully decorated room, BUT in all the bridal shower busy-ness, I forgot to take photos :(
I will learn from my mistakes. 

Have a great week!

Blessings
 

Sunday, March 17, 2013

And the winner is....

Congratulations to:

ALISSA!!
 You have won yourself a whole lot of ribbon!!!

I will be in contact with you super soon!!


I'm sorry if random.org didn't let you win this time - but come and visit again, there will be more giveaways :)

Blessings

Thursday, March 7, 2013

Fabric scraps #2

I know that many people don't agree with me but I never grow tired of bunting. There are so many different types (they don't always need to be triangles) and its just so functional. I had to make some quick bunting with fabric scraps for an event at church and I thought I'd share it with you. Another fabric scraps tutorial is overdue anyway ;) Here is my previous fabric scraps tutorial: Fabric scraps #1

Sometimes you really want bunting but you really don't feel like taking the whole day to do it. So you cheat ;) and use glue!


You will need: 
Fabric scraps
Twine/string/ribbon
Glue (I used wood glue because that is what I had)
Scissors

Ribbon Giveaway

It has taken me awhile (about two years) but I have finally created a facebook page for Bee-inspired.
So to celebrate I am having a giveaway!!

Sadly this giveaway is over. 

Here is what I am giving away:
 8 Rolls of ribbon (of which most of them are made in South Africa)
Each roll is 3 meters (3,3 yards) long so in total you could win 24meters (26,2 yards) of ribbon!!

The 4th ribbon from the left is actually a two in one ribbon - let me show you:
You can hold the middle, thin teal ribbon and ruffle the rest! Isn't that incredible. A ribbon woven into a ribbon - genius!!
So if you would like to win this ribbon hamper here is what you need to do:
There are two ways to enter.

1. For one entry you can like my facebook page and then leave a comment here (not on the facebook page) telling me that you did :)
  2. For another entry you need to either be a follower/become a follower of this blog, and leave a comment saying which of the ribbons is your favourite.
You can do either 1 or 2 or both which would equal 2 entries.
And that is all.
The giveaway ends on Thursday the 14th of March 5pm PST.

I will choose a winner randomly and announce the winner on the 15th of March.
Anyone from anywhere can enter as the prize includes postage:)

Thank you for stopping by and good luck!
I have limited stock of ribbons but if you want to buy some me, please send me an email to inspired.gabi@gmail.com and I will forward you the catalogue.
Blessings

Sunday, March 3, 2013

Free March 2013 Desktop calendars!

We are already 3 days into March and for once I don't feel like I'm still scrambling to catch up!
So here are some free desktop calendars for you in case you haven't had the time to find one for yourself.

  
You can download it here at the Love Mae Blog.


 This one is from Free People.


 My favourite one for the month is from Nicole's Classes.


The blackboard calendar from Design is YAY!

I hope you've had a great start to your month!

Blessings

Wednesday, February 27, 2013

Some fun free prints

I am always looking for some good freebies and who doesn't like stationery. So what better than a combination of the two :)
Here are a few to brighten up your day!

 
Lunch box notes from Whipperberry

 
Journaling cards from Persnickety Prints

Journaling tags from Dainty Dream

Camera Prints from A Sorta Fairytale

(I love this one sooo much!!) 
Mason jar labels from Southern Weddings

And lastly my favourite for the day:


Have a great day!!
Blessings