


For the past few weeks I've been constantly reminded of how I need to throw out the mindset of "I just need this/that before I can do my project", and rather just use what I have. One of my big problems is that I make something as a gift and then usually can't find appropriate packaging. So I've decided to start making my own. It works out WAY cheaper and if I keep it simple it only takes 10min. Here is a basic tutorial so that you can make your own too.

First choose and download a free template from Mirkwood designs for the type of box that suites your need then follow the tutorial. If you want a bigger box than the template, you can re-size it on the computer or with a photocopy machine.
The tutorial below is for 'milk box' packaging, template here, but the same technique applies to all the different box shapes. (I used this one to package cookies)
Print straight onto cardboard or trace the template like I did, because the cardboard I had was too big. (Make marks on the sides so that you know where to rule the lines for the folds)
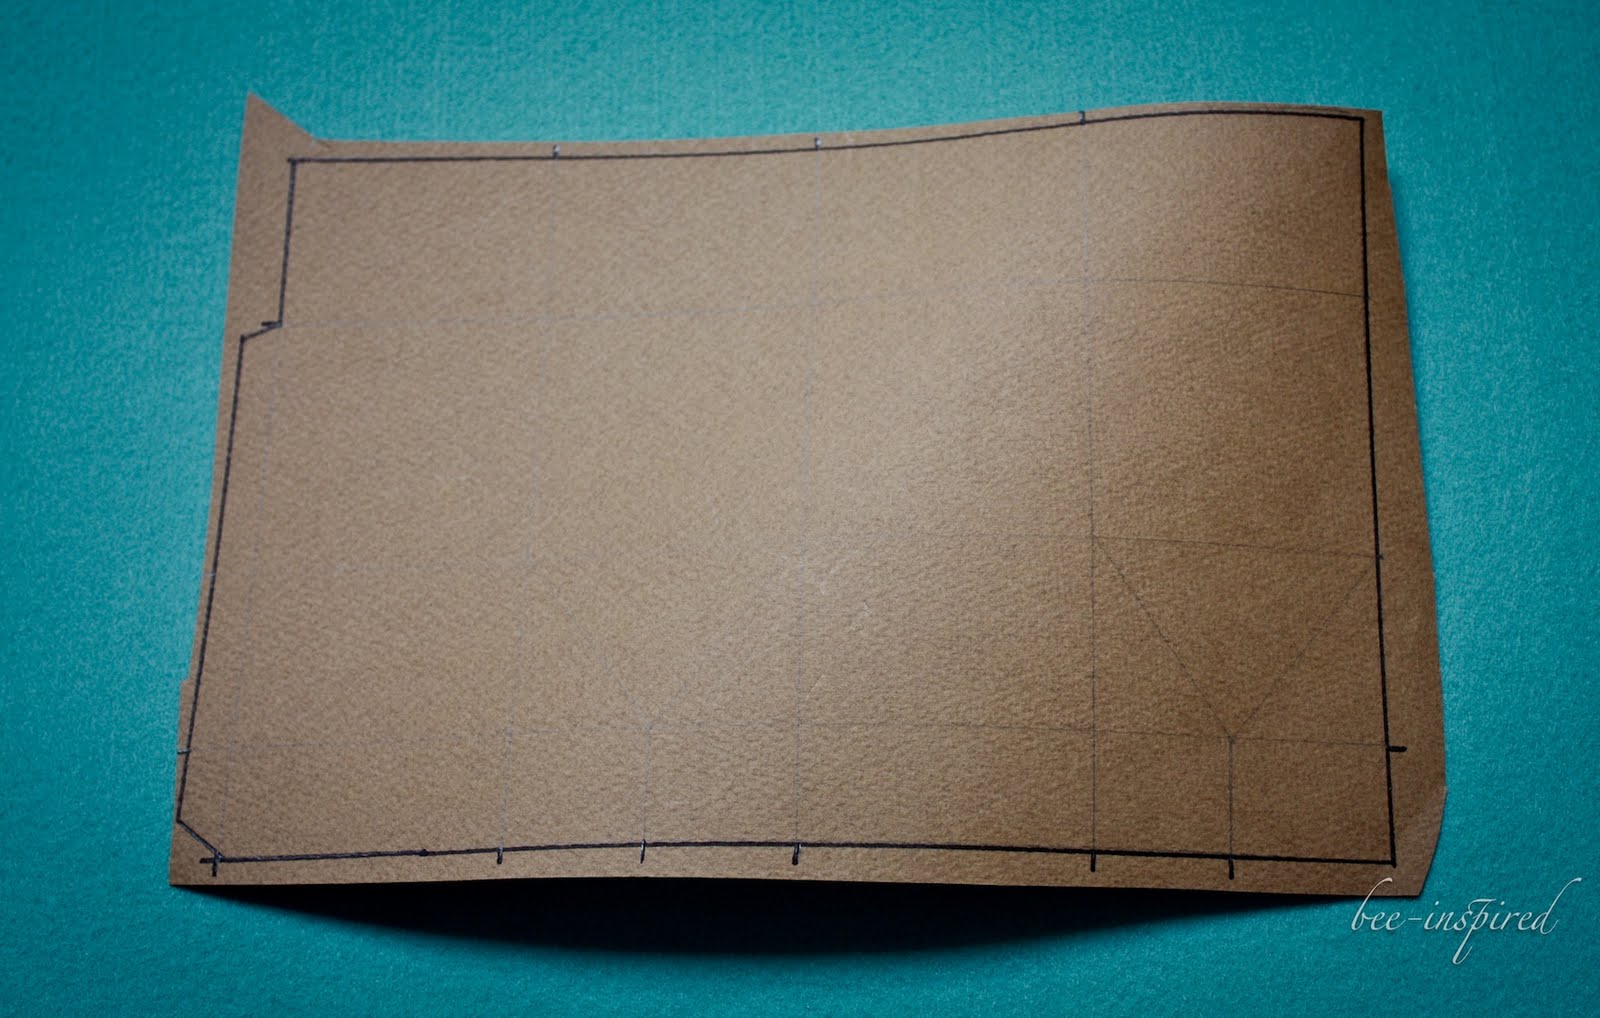

Cut it out and with the back of your scissors trace along all the lines that need to be folded. This just helps to get precise folds.

Now fold along all the lines And cut slits/darts between each of the tabs that you will be sticking together (you can see this on the bottom and right of the picture)

Stick double sided tape to each of the tabs (making sure that the double sided tape is on the right side:) On the second tab at the bottom you can see that I stuck my tape in the wrong place and had to adjust it - don't be as silly as I was - although no-one will see it in the end.

Now fold your box and stick it together. Then add a piece of double sided tape so that you can close your box AFTER you have placed your gift inside the box.

And then do any finishing touches that you need - I usually add some or other stamped design and sometimes a ribbon.
TA DA!!

I usually use the milk box for sweets or cookies. You can easily make it longer by just adding a few cm to the length when you trace it.
Or I make puffy boxes, template here, for small gifts that I sew.

This one was for a bib that I made for a friends baby shower :)

Hope this inspires you to use what you have!!
^-^
(Korean smiley face)

252 comments:
«Oldest ‹Older 201 – 252 of 252Sturdy, reliable custom boxes from Boxproof Custom Packaging . My products are always protected and look their best. Highly recommend!
شكرا جزيلا لتقاسم مثل هذا المنصب رهيبة! إن عملك الجاد وتفانيك مثيران للإعجاب حقًا. أنا ممتن حقًا للجهد الذي بذلته. استمر في العمل الممتاز!
المجموعة الفاخرة من نانو بروتكشن ليرز
By getting a massage, we can relax our muscles and release any built-up tension, allowing us to feel rejuvenated and refreshed.
It is no wonder that these skilled hot girl therapists hold a special place in the hearts of those who have had the privilege of being in their care
A Female to Male spa near me keeps you 24 hours free from stress and makes your mind cheerful.
Massage can help improve flexibility and mobility by increasing blood flow and reducing muscle soreness.
Therapists can tailor the sandwich massage to individual needs, ensuring that each client receives the most beneficial treatment possible
"Looking for the perfect way to greet someone new to the country? These welcome to Canada gift ideas offer a unique and thoughtful selection of gifts that will make anyone feel right at home.
"What a great idea! https://receiptifyofficials.com/ is a brilliant way to personalize music experiences. Thanks for the insightful tutorial—I'm excited to dive deeper into what this platform can do!"
Upgrade your ride with Auto Emporium's premium car ceramic paint protection. Our expert technicians apply advanced coatings that shield your vehicle from the elements, enhancing its shine and value. Experience the Auto Emporium difference today
You have the option to handpick your favorite candies from a wide selection of sweets. The packaging is crucial in candy boxes wholesale, as it adds an artistic touch to the overall presentation.
I’ve learned so much from this blog—it offers great insights! Here's another link for customized packaging with a wide selection of gift boxes that could be beneficial for anyone looking for more options.
Joispa is the best place for customers who are looking for b2b spa because of honest service and reviews. Our therapies give a luxurious feeling by removing all stress from your body and soul.
"Both of these services are impressive! Top Follow outstanding app The rapid prototyping for seamless innovation is essential in today's fast-paced market, and it's great to see a focus on precision and efficiency. On the other hand, the luxury bathroom designs are absolutely stunning—those marble tiles and sleek wall panels can truly transform a space into a relaxing retreat. It's inspiring to see such quality and attention to detail in both manufacturing and design!"
This is such a great idea! I love how you've turned packaging into an opportunity to be creative and resourceful. It’s true that sometimes we get too caught up in waiting for the "perfect" supplies, when in reality, making something yourself can be both easy and cost-effective. The milk box template is perfect for small gifts like cookies and sweets – definitely a good option for homemade presents. Thanks for sharing this simple yet clever DIY tutorial! It really shows how to make the most of what you already have and avoid unnecessary spending. I’ll definitely try this for my next gift. If you're also looking to create custom packaging or designs for your products, you should check out the best print on demand for ecommerce to add a personal touch to your offerings!
hi
This gift box packaging tutorial is truly inspiring for creating personalized and elegant gift presentations. To further enhance your packaging, consider using holographic films, which add a stunning visual impact. Kingchuan Packaging, a leading Bopp Holographic Film Suppliers, offers high-quality films with various patterns and colors, perfect for elevating your gift wrapping to the next level.
thanks
Amazing post
Such a clever and budget-friendly tutorial! Love how you turned a simple idea into something so beautiful and practical — perfect for personalizing any gift boxes. Definitely trying this out for my next batch of homemade cookies!
This tutorial is super helpful! Clear instructions and creative ideas make gift box packaging so much easier and more fun
This tutorial is super helpful and easy to follow! I love how you broke down each step—perfect for beginners and DIY lovers looking to create stunning gift box presentations.
I appreciate the effort you’ve put into creating this content. It’s not only well-researched but also very easy to follow for readers of all levels. Please visit: https://islamarticle.com/
I really enjoyed going through this blog because it is written in such a clear and detailed manner. The way you have explained the topic step by step makes it very easy to follow, and it shows how much effort you have put into creating valuable content for your readers. PLease Visit: Noetic
Great work on this platform! Your content consistently provides valuable and up-to-date information that’s helpful for both beginners and experienced users alike. I appreciate the clarity in your technical explanations, and the way you cover app functionalities, compatibility, and user safety is commendable. Whether it’s about gaming tools, productivity apps, or general software, your detailed insights help readers make informed decisions.
On a related note, for users who are looking to enhance their mobile gaming experience, we recommend checking out our latest Lulubox Pro. It’s a versatile tool that allows Android gamers to unlock premium features, manage in-game resources, and en
joy ad-free gameplay on popular titles. The app is frequently updated for performance and security, making it a reliable choice for the modern mobile gamer.
Thanks for sharing this guide. I never knew a Black Rectangular Box could be used for so many products in retail and gifts.
When searching for Printing Services in Telford, I found that not all providers give the same level of care and quality. That’s why I was pleased to discover AYP LTD. They deliver excellent results and help with custom designs that really make your business materials stand out. I ordered some posters and business cards, and the quality was fantastic. The staff were supportive and quick to respond, which made the whole process smooth. Having a reliable printer locally is very useful, and AYP LTD has become my go-to choice. They really are a dependable partner for printing needs.
Really enjoyed reading your blog! The points are clear and easy to follow, and it’s very informative. Keep up the good work. Please also visit my Islamic site. Islam Article
Really enjoyed reading your blog; the way you explain things feels simple and natural, which makes it fun to read. Keep sharing content like this, it genuinely adds value. Please visit my site as well. Wiznet
Great blog! The content is insightful, well-written, and genuinely helpful. I really enjoyed reading it and learned something new today. Please visit my site as well. SAUNAS and Stuff
Really good blog! The way you explained everything is simple and easy to follow. I found the information useful and well-written. Thanks for sharing such content. Please visit my site too. Good Life Concrete
Great content! I really enjoyed the way you explained everything so clearly. Looking forward to more posts like this.
Please visit my site as well. Call Doctor
Great blog! The content was very insightful and well explained. I can tell a lot of research went into making this post valuable.
Please visit my site as well. Chauffeur Service
Amazing blog! The way you explain things is so clear and enjoyable to read. Looking forward to more posts from you.
Please also visit my site as well. 800 Homes
Great blog! I really enjoyed the way you explained everything so clearly. Your writing style keeps readers engaged from start to finish.
Please also visit my website whenever you get a chance! Call Genie
A very informative and well-structured blog. The role of packaging as a brand ambassador is explained perfectly. It’s true that packaging is often the first customer interaction. Nicely written.
This post looks absolutely amazing and reflects great creativity and effort. The style and presentation are very impressive and leave a strong positive impression. Noetic is a fashion brand that truly understands elegance and quality, offering timeless designs for modern women. Noetic
The most reliable way to log in to your PayPal account is through official channels. PayPal offers several secure ways to access your account:
Sometimes browsers fail to display login pages correctly. Clearing your cache, updating your browser, or using another device often resolves these issues.
PayPal Login
The Gift Box Packaging Tutorial - Bee-inspired offers a delightful and creative way to elevate your gift presentation. For viewers looking to unwind after crafting, Nekopoi Web Nekopoi Web provides an easy way to explore animated content online with a clean, browser‑friendly layout that works across devices.
This is a very informative and well-written blog. I really enjoyed reading it and found the information helpful. Great work—keep it up! And don’t forget to visit my website as well. Mathyo Tyres
This blog is well-written and very informative. The content is helpful and easy to understand. Great job! Don’t forget to visit my website as well. spring cypress ER emergency center kingwood
This blog provides useful and informative content. Everything is explained clearly and nicely. Great effort! Please don’t forget to visit my website as well. spring cypress ER
Really insightful points here. A lot of local businesses struggle not because of lack of effort, but because they don’t have the right structure in place. Clear positioning and consistent messaging make a huge difference.
I’ve seen strong results when businesses focus on local business marketing with a proper strategy instead of random tactics.
This is a very well-written and informative blog post. The content is clear, useful, and easy to understand. I really enjoyed reading it. Please don’t forget to visit my website as well. mechanical manufacturing machinery
Great advice for new entrepreneurs. Practical, clear, and actually useful. I also found some helpful business insights here: SAZ Square
This was a very useful and well-explained post. Spider problems can quickly get out of hand if they are ignored, especially in homes and commercial spaces. For anyone looking for professional spider pest control, this service is worth checking out.
This is such a creative and practical gift box packaging tutorial! I really like how you explained the step-by-step process in a simple way. DIY packaging like this is not only cost-effective but also allows full creativity in design and presentation, which is very important for both personal and business use.
In today’s market, packaging plays a major role in branding, especially when businesses focus on visual appeal and structure. A well-designed box can instantly improve the perceived value of the product and enhance the customer experience.
From our industry experience at Sky Print and Enterprise, we see the same importance in Custom Pizza Boxes , where strong design and high-quality printing help businesses stand out. Whether it’s food packaging or gift packaging, presentation always makes a strong impact on customer perception.
Really enjoyed this tutorial—thanks for sharing such a useful and inspiring idea!
This is a very helpful and informative blog post. The content is easy to understand and well explained. Please don’t forget to visit my website as well. advice for new entrepreneurs
This is such a well-written piece! The insights here are truly valuable and very informative. Thanks for sharing this. Please don't forget to visit my site as well! 6.5 prc vs 308
This is a very well-written and informative blog. The content is clear, simple, and helpful for readers. I really enjoyed reading it. Please don’t forget to visit my website as well. Invaders Canada
I'm truly impressed by your outstanding work! Recently, I came across a remarkable website Mekan Tratech with exceptional performance. I couldn't wait to share it with you, as I think it'll greatly enhance your online experience. Kudos to you, my dear Prepaid Cards friend, for your exceptional efforts!
Post a Comment