


For the past few weeks I've been constantly reminded of how I need to throw out the mindset of "I just need this/that before I can do my project", and rather just use what I have. One of my big problems is that I make something as a gift and then usually can't find appropriate packaging. So I've decided to start making my own. It works out WAY cheaper and if I keep it simple it only takes 10min. Here is a basic tutorial so that you can make your own too.

First choose and download a free template from Mirkwood designs for the type of box that suites your need then follow the tutorial. If you want a bigger box than the template, you can re-size it on the computer or with a photocopy machine.
The tutorial below is for 'milk box' packaging, template here, but the same technique applies to all the different box shapes. (I used this one to package cookies)
Print straight onto cardboard or trace the template like I did, because the cardboard I had was too big. (Make marks on the sides so that you know where to rule the lines for the folds)
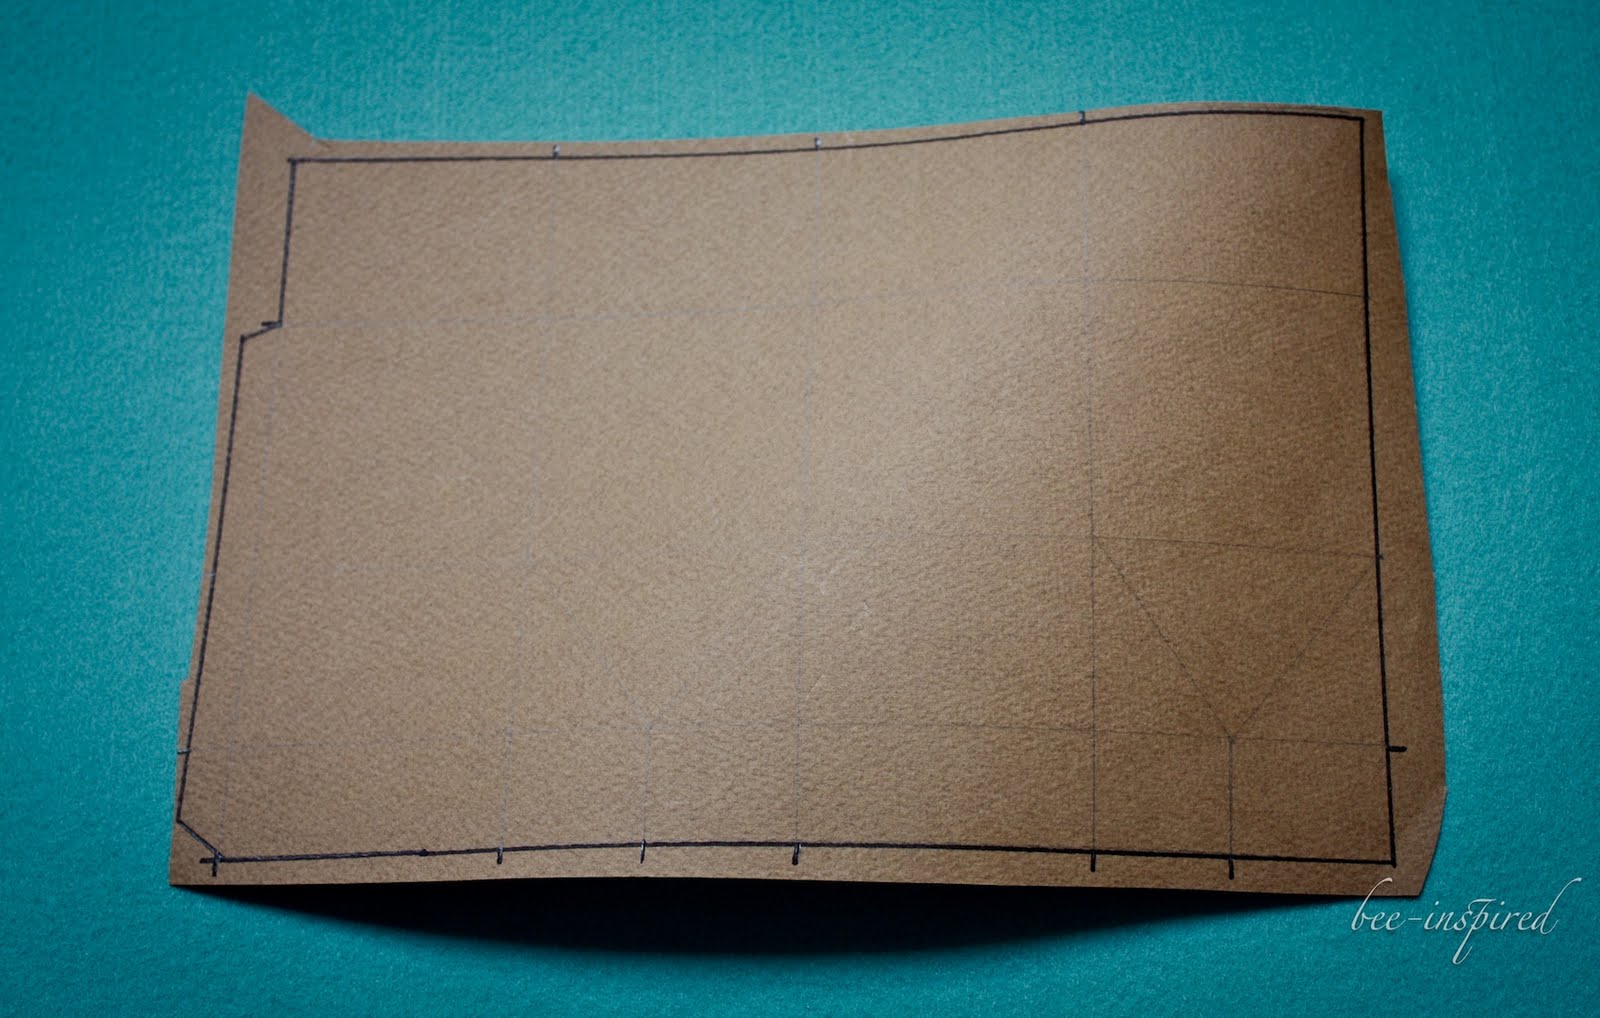

Cut it out and with the back of your scissors trace along all the lines that need to be folded. This just helps to get precise folds.

Now fold along all the lines And cut slits/darts between each of the tabs that you will be sticking together (you can see this on the bottom and right of the picture)

Stick double sided tape to each of the tabs (making sure that the double sided tape is on the right side:) On the second tab at the bottom you can see that I stuck my tape in the wrong place and had to adjust it - don't be as silly as I was - although no-one will see it in the end.

Now fold your box and stick it together. Then add a piece of double sided tape so that you can close your box AFTER you have placed your gift inside the box.

And then do any finishing touches that you need - I usually add some or other stamped design and sometimes a ribbon.
TA DA!!

I usually use the milk box for sweets or cookies. You can easily make it longer by just adding a few cm to the length when you trace it.
Or I make puffy boxes, template here, for small gifts that I sew.

This one was for a bib that I made for a friends baby shower :)

Hope this inspires you to use what you have!!
^-^
(Korean smiley face)

261 comments:
1 – 200 of 261 Newer› Newest»What a great idea! thank you for your tutoria
Your packaging is so beautiful! Thank you so much for the tutorial!
They are great. You should consider using Washi tape to finish off the 'quirky' factor!
Thanks for tutorial ... wish u can share more here... really appreciate ^^
Fabulous tutorial ... the boxes look fantastic ... thanks ... SilkMari
I just Bookmark this Article. Thanks for the useful information. Can't wait to practice.
Great DIY - but can you give advice on where to source the cardboard?
Great idea!! Thank you for sharing :O)
Great ideas and nice photos. Thanks for sharing the link for where to get templates - perfect.
Any tips of type or weight of card to use anyone?
I just made one and it came out adorable! I used an old cereal box with the brown side out-great way to recycle, stamped it, glued on some rhinestones, and filled it with newspaper. it came out soooo cute!
Thanks everyone. Chelsea I would love to see what you made.
Saturations & Ocean style jewellery: I just bought card at the local stationary store - they only speak Korean so they couldn't tell me the type or weight. (I'll get back to you on this)
^-^
Way cute! Thanks for the tips, my husband rolls his eyes every time I say "Well I just need...." when I look at a new project. I'm learn to use what I have too, I started Kanzashi flowers and found that 1 1/2" ribbons works great...and I have a ton of that stashed away
I love these oh so much! I just got done making four of these for my favorite teachers at school. They certainly do make great little gift boxes. :) Thanks for sharing!
Cool! :) thanks for sharing!
The milk box tutorial is so cute I could not believe!! I think I just found a box for my little sister's birthday present!!! ;)
Nice gift packaging tutorial.
Nice blog with awesome stuff!! Can you provide more information?? We are in fact waiting for you…
moving boxes for rent
I am so glad to be given a chance to read your wonderful article. Im looking forward to read more of your works and posts. You did a good job! Try to visit my site too and enjoy.
triciajoy.com
www.triciajoy.com
What a creative idea. It’s quite amazing that a simple piece of paper use as packaging paper. Everybody can make their packaging box but the thing which we need, only creative ideas and mind.
custom packaging
Innovative idea to utilise cardboard to create a beautiful gift. Good for holidays to keep your friends happy and surprised.
what a creative idea i am so glad to be given a chance to read your articles thanks for sharing this information we also deal in Custom Packaging Boxes
Hi, Your blog is nice. We are Manufacturers of Packaging Boxes in India.
Custom packaging boxes looks exceptionally tasteful and remarkable and it is the absolute best method for gifting somebody in this crates as they are extremely moderate and dependable utilized by anybody.
It is simply wow post related to packaging. Such a great information. Thanks!
which packing box
you shared it's very helpful my bussiness.
today, I visit your site, it's very nice about packing box
.
The box would be the kind of box needed in the manufacturing of household goods above the current market. Now all types of boxes are used not only for packaging but also as a marketing promotional product.
in bao bi so luong it
in bao bi vo hop
in bao bì vỏ hộp
These custom made packaging boxes are so well presented.you can have look on these Packaging Boxes
Thank you So much for such an Amazing Blog Gift Packaging Boxes Tutorial. These Packaging Boxes look Fantastic. Again Thanks for Sharing Cool Boxes.
Thank you for sharing this great idea, how to make gift boxes. Stunning idea to make pillow boxes.
our packaging is so beautiful,Thanks for sharing
Love this idea Carolyn. The Painted Harvest set is very popular and rightly so. Love the idea of including the Pizza Boxes. Thanks for sharing your wonderful creation
Custom Pizza Boxes
, Packaging boxes
Hey that's a great effort you did, Thank you very much for sharing. Keep sharing more.!
Printing Sleeve Boxes
Awesome idea to reuse or made something interesting from used printed custom boxes
Your blog helps me design different gift packaging boxes. Thanks for posting and please keep posting.
Thus, box’s composition along with design and style can be quite a little practice, of course, website click here find more check this this website learn more see this details here if attached with the guidance of how to unfold, it might leave an amazing image.
Nice Packaging with description. Quality work done. Thanks for sharing. You can also check us for customization.
Custom Printed Gift Boxes
Your blog help me to make beautiful gift boxes. Thanks for this.
Your pillow boxes looking good.
nice blog, thanks for sharing with us!
Regards,
Packaging Consultant Services
Our Services
Packaging Consultant India
Product Packaging Consultant
Food Packaging Consultants
Pouch Packaging Consultants
Liquid Packaging Consultants
gift boxes
Found this post very informative. Looking for custom Gift boxes? Get the best customize boxes along with free shipping right now by sending a quote.
gift boxes
Found this post very informative. Looking for custom Gift boxes? Get the best customize boxes along with free shipping right now by sending a quote.
For the sake of providing the best quality of food. And the boxes are made by the packaging companies which we can search on our search engine. iCustomBoxes providing the solution all kind of issues related packaging You Can customize your Cereal Boxes at icustomboxes.
I like all the content articles, I really cherished, I would like more information concerning this, due to the fact it is extremely great., Thank you regarding talking about.
The Custom Packaging Boxes
Custom Boxes Wholesale
Business Cards
Mailer Boxes
Thanks for the post! It's inspiring...
Very Nice blog about packaging of gifts. you can also use custom gift boxes for the packaging of your presents
Kumar
Thanks for sharing this information it's very useful for me. You have clearly explained thank you.
Fabulous idea,this blog help those people which are working in packaging industry.There are many companies providing custom Boxes View my website
What a great idea? I am pleased you shared this idea here. I want to pack gift for my friend and looking for different ideas and thankfully dropped here. You can also check other techniques here. Business Card, Flexographic Printing, What is Screen Printing
I like all the content articles, I really cherished, I would like more information concerning this, due to the fact it is extremely great., Thank you regarding talking about.Custom Boxes
Essential Oil Packaging
Thanks for sharing such very nice, amazing and informative blog. i like all content of this blog. I would like to say that I got some important points from this blog. I want to pack gift looking for different ideas then i got ideas from this blog.
Again thank you
What a creative idea. It’s quite amazing that a simple piece of paper use as packaging paper.gift boxes
Thanks for the amazing guide! Really enjoyed reading the post and images are great!
Custom Packaging Printed Boxes
Thanks for sharing this blog.fabulous idea, packaging play important role in over society. cannabis chocolate boxes are amazing
Custom printed boxes are the unique packaging way to secure products and help businesses to attain their marketing and sales goals. Our unique packaging boxes are customized in any shape, sizes, or color according to the customer requirement. As a professional manufacturer and suppliers we create cosmetic boxes from scratch to add more value to the product, make it stand out in the crowd and to make your business reach the heights of success!
We here at DnPackaging offer you high quality Gift Card Boxes. Order your boxes now
We are providing high-quality customized packaging boxes with color printing and logo printing.
custom pie boxes
custom burger boxes
french fries boxes
Empty Cigarette Boxes
Very informative article thanks for sharing with everyone Custom Boxes
This boxes look beautiful thanks for sharing Best custom Boxes
This pack is so much astonishing. Doob Tube is the foremost astounding thing I have ever seen. Like a chain smoker, I would adore saying the best Doob Tube can provide distant stronger security of our cigar or a joint case. Thank you so much.
really very informative and helpful article about Custom Printed Boxes Wholesale
Window Pillows are an incredible wellspring of solace and OXO Packaging has improved this solace by giving Custom Kraft Paper Pillow Boxes. These Window Pillow Boxes are set up in a few structures, materials, modified cuts, size and shapes.
thansk for sharing this helpful article about retail packaging boxes
nice overview. thanks for sharing it coffee Boxes
Thanks for sharing this blog.this blog is very useful.
包裝 盒
thanks for sharing this helpful and informative article. for more info about gift boxes click here
All of our packaging boxes have been a great success and as far as it is about cardboard cigarette boxes, they are number one box in a lot of ways.
Paper Cigarette Boxes,
Bath bomb packaging,
Pre Roll Packaging,
Cardboard Cigarette boxes,
Blank Cigarette Boxes,
french fries boxes,
gable boxes with window,
pencil packaging,
book box packaging,
Custom Snack Boxes
Great idea!! Thank you for sharing :O)
graduation gifts 2020
anniversary gifts for him
european linen pillow
business card boxes wholesale are the most recognizable introduction of business just as legitimate jobs. Look over the huge assortment of Custom Printed Business Card Packaging Boxes to bundle business cards for your clients.
lovely post about Custom Boxes
I like your ideas about creating custom gift boxes. I will definitely them at home. Thanks!
Get custom gift box packaging quote today
Thanks for sharing such great information, I highly appreciate your hard-working skills as the post you published have some great information which is quite beneficial for me, I hope you will post more like that in the future.
Custom Printed Boxes
Custom Boxes with Logo
Best packaging service for your custom eyelash boxes. The Legacy printing is best option for your packaging boxes.
An understandable gift box packaging tutorial is good. I will surely use this one to pack boxes.
We understand that you can't risk using the cheap stuff and you know to know about the packaging quite accurately. Here we will give you a complete step by step guide which will, in the end, able you to choose only the right type of cigarette boxes which can completely suit your needs. As you know that cigarettes are used on a grand scale and the number of people who use them is consistently increasing.
Wow, the amazing tutorial I liked it a lot. Thanks for helping everyone.
Marketing Agency
Very nice tutorial! Thanks for sharing! For your information, this custom boxes manufacturer offers plastic gift packaging boxes, OEM custom plastic parts, custom plastic cases, custom packaging boxes wholesale...
We offer custom boxes that give you full liberty of customizing the entire packaging at every step. Packaging is the first thing a customer notices. It has to be spot on to appeal to the customers. The visual appeal ticks a customer before they could actually choose a product. Packaging is the first impression we are committed to make that leaves a lasting impact on the customers.
The Custom Boxes Print
Soap Boxes
Slider Boxes
Nail Polish Boxes
Lipstick Boxes
Pillow Boxes
Custom Lip Balm Boxes
Thanks for sharing such an informative post about Box Packaging. I really appreciate your efforts. Please keep posting.
If you want to explore about Custom Printed Retail Packaging and Packaging Boxes , Please visit Printingblue .
This article is extremely educational lastly I got what I needed. Thank you kindly for this Information.
transaction advisory services
I feel really happy to have seen your webpage, you are a great author. I am appreciating your effort. You can also check our blog : corporate gifts
Great post I like it very much keep up the good work.
Cream boxes Indiana
Cube boxes Indiana
It is a very informative post thanks for sharing the information.
Cookie boxes Illinois
Corrugated boxes Illinois
great job thanks for sharing with us
visit our website for customize boxes
great site
visit our website for boxes
I appreciate your post thanks for sharing the information.
bulk Pizza Boxes for sale
best Custom Snack Packaging Boxes
affordable printed Soap Boxes
A pie is a baked dish that is usually made of a pastry dough casing that contains a filling of various sweet or savory ingredients. Sweet pies may be filled with fruit, nuts, brown sugar, or sweetened vegetables. Savory pies may be filled with meat, eggs, and cheese or a mixture of meat and vegetables. Get More Info Custom Pie Boxes
visit our website for boxes
great site
visit our website for boxes
This article contains some of the best information on this subject. I found this easy to understand and interesting to read. This is good content. Business Card Boxes Wholesale
I have read your article; it is very instructive and valuable to me. I admire the valuable information you offer in your articles. Thanks for posting it.
Gift Boxes
Thank you so much for the post you do. I like your post and all you share with us is up to date and quite informative, I would like to bookmark the page so I can come here again to read you, as you have done a wonderful job.
Cardboard Display Boxes
Display Boxes
You make so many great points here that I read your article a couple of times. Your views are in accordance with my own for the most part. This is great content for your readers. legit extra income from home
custom cigarette boxes
Cardboard Cigertte Boxes
This blog is great in the information that it delivers! it has helped me find so much relevant information. I am sharing another link for customized packaging that might come in handy for you all! there is a wide variety for gift boxes gift boxes.
I really liked your post. Thanks for sharing!!!
Essential Oil Packaging Boxes
Great post I like it very much keep up the good work.
Photography Packaging packaging Boxes wholesale
high end Spa Boxes Delaware
Its very useful for me Good job.Handle Boxes
It's Really good blog. I Like the way how you explained it. I am grateful to read it. Thanks for sharing.
For more information about Custom Printed Display Boxes, Please visit Printingblue.ca
Generally I do not read article on blogs, however I wish to say that this write-up very forced me to check out and do so! Your writing taste has been amazed me. Thanks, very great post.
Paper Cigarette Boxes
Cigarette Boxes
PackagingNinjas offers you amazing quality and different color combinations of two-piece Custom Gift Boxes with lids. They are made from rigid cardboard, which protects your expensive gift from any mishap. Our experts use alluring colors to make these Packaging Boxes more attractive. These packaging boxes are available in many designs, you can choose your favorite color and design of the packaging box to meet your demands. We assure you that our packaging Custom Printed Boxes will inspire your loved ones.
A distinctive paper display box will attract the pool of customers towards it, while can be proudly showcased in front of the clients at the shelves and store. To generate additional sales, the soap boxes must come with the marketing slogans and printed logo, so your soaps are easily differentiated! In Counter Display Boxes We offer materials like lightweight Kraft paper that are environment-friendly and very easy to carry. Call our expert team and they come with super fine new ideas to enhance the custom soap packaging appearance.
Zen Incense Burner Series has been carefully handcrafted from beautiful, glazed ceramic. Use for mind, body and spirit science. Our zen incense holder can be used as an arom.
Some important points from this Article. My Custom Boxes is best option for your Cheap Custom Boxes.
Freelance Avaya Certified Solutions Architect
A name of trust and reliability among many newly emerging brands in the packaging industry but maintains its name and reputation with dignity and strength. PackagingNinjas is offering the best rates with high-quality packaging boxes particularly for candles with free delivery at your doorstep within no time. Any kind of Custom Candle Box will be prepared as per the demand of the client with the material of his choice and the style of his desire.
Bath Bomb Packaging
French Fry Boxes
Get order from Packaging Republic of rigid boxes with free shipping at best price in USA. We are masters and experts in custom packaging solutions. If you need the Best Pre Roll Packaging, contact us.
Very informative. Really like your article. Need more on Kitchen Renovation in Sydney
You are also allowed to select your favorite candies from a range of sweets. The packaging plays a vital role in candy boxes wholesale packaging because of the artistic appearance of the box.
VERY INTERESTING ONE .. THANK YOU FOR SHARING YOUR KNOWLEDGE WITH US
presentation boxes
game boxes
invitation boxes
pre roll packaging
pre roll boxes
Blank Cigarette Boxes provide you the best Blank cigarette boxes, which will protect your customer as well as give it a perfect look.
Car tracker in Sargodha
Car tracker in Sialkot
833 Area code
I recently visit your site and read your blog. It is well equipped and perfect. well done!Let me tell you about my wholesale business of Custom Donut Boxes. Custom Donut Boxes are the only way to protect your product inside the box. Rush Packaging is the most flourished packaging hub in the USA. We have the best solution for your Donut Packaging that you cannot get from anywhere.We have countless and matchless packaging features at our packaging hub that you can get for your packaging.
Custom Coffee Packaging
Popcorn Boxes Wholesale
Cupcake Boxes Wholesale
Burger Boxes Wholesale
I read your blog. your blog was very helpful for me. Here I want to introduce my business which is related to packaging Custom Pizza Boxes.These days the demand for pizzas has been increased during the pandemic. Only durable and secure Pizza packaging can save the product from all kinds of impurities. We are offering many cheap and affordable offers and deals that will prove budget-friendly. You can get Custom Pizza Boxes bulk by customizing them at reasonable and affordable prices.
Custom Coffee Packaging
Popcorn Boxes Wholesale
Cupcake Boxes Wholesale
Custom Burger Boxes
Nice blog i like it very much keep up the good work.
custom Pen packaging
CustomBoxesPlus is the renowned packaging hub in the USA and the best packaging organization for your blank cigarette boxes.
custom boxes
Custom Pre Roll Boxes
Custom Cigarette Boxes
blank cigarette boxes
I saw your post you are doing such great work. Here I want to show you my Business which is about Blank Cereal Boxes. Rush Packaging provides you various kinds of Blank Cereal Boxes that are in different designs and shapes. As well as you can gain custom Cereal Boxes that are looking stunning and appealing. These boxes are the best fit with your business needs as well as your desires. Get custom printed cereal boxes by us at a reasonable cost. As well as avail free shipping service without any charge.
Popcorn Boxes Wholesale
Custom Burger Boxes
Custom Cereal Boxes
Bakery Boxes
Grab inspiring easy to use pencil boxes at Orchard Packaging with free shipping worldwide. The organic Pencil Boxes can be customized in prints and designs.
Corrugated Box Packaging
Bath Bomb Packaging
Personalized Pencil Boxes
Candle Box Packaging
I saw your post you are doing such great work. Here I want to show you my Business which is about Custom Burger Boxes.The Custom Burger Boxes for Rush Packaging are made from FDA-approved material that protects the food. The boxes are made for the brands to give them a unique packaging style to enhance their business exposure. Get astonishing burger boxes with custom prints with evolving designs. We have a free shipment policy for eloquent boxes to all worthy customers worldwide.
Popcorn Boxes Wholesale
Custom Burger Boxes
Blank Cereal Boxes
Bakery Boxes
A decent approach to convey and straightforward. Here I need to show you my Business which is about Burger Boxes.We also offer bulk order discounts and special event flat-offs on our custom packaging so that you will be able to get more boxes in fewer amounts.GoToBoxes is a reliable and experienced packaging company that has gain expertise in making every type of custom packaging box. For burgers, what we can give you people is the high-quality Paper Burger Boxes which are made up of Kraft stock. This packaging stock is highly valuable due to its nature-friendly properties.
Hot Dog Boxes
I read your blog. your blog was very helpful for me. Here I want to introduce my business which is related to packaging Retail Boxes. At UrgentBoxes, you can customize your boxes in any way you require. Furthermore, they offer international shipping so you can get quality counter display packaging no matter where you are.
Counter Display Boxes
Display Boxes
Pillow Boxes
Urgentboxes
Training service provider in united arab emirates for NDT level 2 course, welding course dubai, and QC Welding inspection training for oil and gas industry, Chemical and industrial and marine service companies.
Hotmail was one of the first public webmail services that could be accessed from any web browser. Since 2011, Hotmail, in terms of being Microsoft’s free webmail platform, has been replaced with Outlook.com. Outlook.com is a personal information manager web app from Microsoft consisting of webmail, calendaring, contacts, and tasks services.
Hotmail sign in |
www.amazon.com/mytv |
amazon.com/code |
Hotmail login
I am so glad to tend an opportunity to read your wonderful article. I'm looking forward to read more of your works and posts. you probably did an honest job! Fratres.
with the entire list of Disney channels and other exclusive shows. It allows you to watch the videos on demand by subscribing to disneyplus.com/begin or activating the subscription on disneyplus.com login/begin.
Disney Plus streams various videos, including movies, shows, originals series, documentaries and adventures shows.
It also contains the content directly from Disney Vault. But, before taking the Disney Plus membership, you must make sure that your device is compatible with Disney Plus.
Disney Plus has a high-value position amongst its customers. It gives you access to the entire Disney library with only one subscription, without any need to pay for the different Disney Channels.
The subscription includes hundreds of movies and thousands of different shows.
DisneyPlus.com login/begin
zoom login
Hotmail Sign in
omegle
tubi.tv/activate
ebay motors
Nice post information. Thanks for sharing information. We really appreciate you.
How to Compliment a Girl without Being Creepy
CBD packaging Store provides high-quality custom 60ml bottle boxes that give you full liberty of customizing the entire packaging at every step. Get your 60ml bottle boxes at the lowest wholesale prices with a low minimum order limit & free shipping. We are here 24/7 to assist you with packaging solutions
I am glad to discover this page. You've got so much information on here. Thanks for sharing. Keep up the great work.
Visit here: How to Send Electronic Cigarettes or Vape to Your Friends?
Reddit video downloader is a free tool that enables you to download and save ANY reddit video using an easy to use online web interface.
This is a great inspiring article.I am pretty much pleased with your good work.You put really very helpful information. Keep it up. Keep blogging. Looking to reading your next post. akatsuki puffer jacket
Thanks for sharing this Knowledge about Custom Box through informative Article. I really love to read the trending Content. It is increase the Knowledge. You have Experience with Custom Printed Rigid Boxes then Please share with me for write the best Article.
This blog is very informative. Custom Packaging can be a long excited process but it can be made easier by following the tips that you have mentioned above. Thanks for sharing such important and useful information. Keep it up.
visit mentioned website for printing and packaging services.
custom cake boxes
I really like it the most. You have really done great job by sharing the beautiful post.Custom Hair Extension Boxes
Our the purpose is to share the reviews about the latest Jackets,Coats and Vests also share the related Movies,Gaming, Casual,Faux Leather and Leather materials available Marty Byrde Jacket
This tutorial for the Packaging gift boxes is really helpful to me in ways that I also use Custom Mailer Boxes a lot for my products and they really increase my sales volume. Thank you for sharing this important information.
Custom gift boxes can also make great promotional gifts. Custom Gift Boxes can be made with heavy cardboard if the purpose is to store and transport weighty products. Or they can use standard material depending on their utility nature. Your Suitcase Boxes will be made from heavy cardboard if you have specific needs.
It's a really great and useful piece of information. Thanks, and please keep up the rewarding work. Oakland A's Starter Jacket
eally very happy to say, your post is very interesting to read. custom boxes
Great post. Thanks for sharing this post.
CBD Product Boxes Wholesale
Cool idea. Thanks for sharing this post.
How Do You Impress Your Client by Custom CBD Packaging?
Amazing Blog with wonderful articles of useful content. I wan to thanks you for such great information. I suggest you to please try the customized boxes for any kind of products which have to be packed through custom printed packaging, Because we have a large variety of looks designs and creation of quality materials that surely will enhance your branding drives.
I'm delighted to come on your informative post. Any type of product requires the use of packaging boxes. Use these designs, styles, colours, shapes, and stocks to pack your products in a stylish manner. We also provide error-free design and free shipping services throughout the United States.
Great post! Thank you so much for sharing all this wonderful information. So much useful and easy to read for everyone. Read more:The customized boxes
You can do very creative work in a particular field. Exceptional concept That was incredible share. I Need Cha Cha Beat Boy Jacket
I appreciate your post. This post is really awesome. Thanks for sharing.
What Can We Do To Enhance The Flavor Of Our Vapors?
I’m very glad to visit our informational post. I appreciate good writing. This is the best way to announce your views to the world.Custom Printed Packaging Boxes
I appreciate your post thanks for the information. Some products require special packaging solutions the keep their worth and value intactCustom Gable Box
After shaking hands with the Custom Printed Ring Packaging Boxes.you will not be happy to see the revenue but your product will become alluring and charming too because not only the customization characteristics but all the remarkable offers help the traders not only to save the packaging cost but shipping cost too.
Customization does not only make product unique and bewildering but also eye catching and the first choice of the customers as well. The customization that is done here is not limited to design and size only btw e entirely changes the look of the custom rigid boxes.
Nice post .Custom Popcorn Boxes provides custom and cost-efficient Popcorn boxes for all kinds of personal and professional requirements
We are team of professional accountants, having experience in this field for more than 10 year and providing account and finance services like preparation of tax return documents like 1040, 1120, 1120, 1065 etc if you are interested than visit our site American Income Tax Service
Very Nice
You have captured readers with your compelling and interesting views. Check out our custom mini boxes selection for the very best in unique or custom, handmade pieces from our gift kraftboxes shops.
Thanks for sharing step by step pictures.
Wellshop.pk
I'm happy to have read your valuable content. box packaging is required for every product. I hope you keep doing your work in this way going forward. all of your interest is packing Discover more by reading aboutClick Here
Nice post. Best International Schools in Lahore
This is really nice to read content of this blogSweet Packaging Rigid boxes
Thank you for sharing useful information regularly. It's a great habit to look at your blog posts daily.
Nice blog. Visit Here
baby clothes
It also assists children in developing their linguistic skills and social skills. Collaboration and sharing are required while playing with another youngster or adult. The process of donning and removing costumes or kids' clothes has also been shown to have physical advantages. Please also visit Cocobee if you are seeking high-quality kids' clothes online.
cheap car hire dubai
Start the engine, and your trip begins with that great feeling. Everything we do at carhiredubai.co.uk is focused on giving you the freedom to learn more. We'll go above and beyond to locate you the ideal automobile for hire and ensure that the entire process is easy and hassle-free for you.
Thanks for sharing this article, I really impress your work. Such a great knowledge you shared with us. Want to fascinate the seabed with your empire and dominancy? Get the Hungry Shark Evolution Hack tools No Survey today by clicking on the link and running this arcade.
Körjournal
Sveriges enklaste körjournal! Vi automatiserar registreringen av körjournal, milersättning och trängselskatt för dig som kör företagsbil eller förmånsbil. Cartracker GO är Sveriges enklaste körjournal och loggar automatiskt all dokumentation som krävs av skattemyndigheten så att varken arbetsgivare eller arbetstagare riskerar att bli beskattade i efterhand
Thanks for the amazing guide such nice post keep it up custom cardboard boxes
Sobald du aniworld download einen Anime gefunden hast, der dein Interesse weckt, kannst du darauf klicken, um weitere Informationen zu erhalten. Hier findest du eine Kurzbeschreibung des Animes, Informationen über die Episodenanzahl und Bewertungen von anderen Benutzern. Wenn du bereit bist, den Anime anzuschauen, klicke einfach auf den "Stream starten" Button, um das Abspielen zu beginnen.
Rigid gift boxes are an absolute game-changer when it comes to presenting gifts in an elegant and sophisticated manner. These boxes exude a sense of luxury and craftsmanship that instantly captivates the recipient and adds to the excitement of unwrapping the surprise inside.
uk 49 lunch prediction for today nice post
LAMTOTO nice work
Carbon fiber steering wheels well
pillow box packaging offers an elegant and distinctive presentation for your products. Shaped like a pillow, these boxes are easy to assemble and ideal for small items, gifts, and party favors. Their eye-catching design and variety of sizes make them a standout choice for enhancing product appeal and creating a memorable unboxing experience.
fine art very well
agencia seo nice work
roofing companies Auburn AL good
well Metal roof Installation Miami
I'm truly impressed by your outstanding work! Recently, I came across a remarkable website with exceptional performance. I couldn't wait to share it with you, as I think it'll greatly enhance your online experience. Kudos to you, my dear Prepaid Cards friend, for your exceptional efforts!
Exciting tutorial.
your brand with
Gable boxes tailored to your unique specifications. Crafted with precision, these boxes seamlessly blend functionality and style. Ideal for retail, events, or gifting, the personalized touch enhances your brand identity, leaving a lasting impression. Stand out with bespoke packaging that reflects your distinct vision.
Thanks for shareing this comment
Storz & Bickel continues to embrace smart technology with the venty test Vaporizer. Bluetooth connectivity allows users to sync the device with a dedicated mobile app, offering a range of customization options. The LED display provides real-time information on temperature settings, battery life, and session duration, ensuring users have complete control and awareness of their vaping experience.
government contracting
Thanks for shareing comments
Thanks for shareing comments
You're excelling in your efforts, and your work is both impressive and incredibly beneficial for me. Likewise,
I recently meetwise discovered a AI Virtual Assistant website related to meetwise, and it's proving to be highly effective.
I wanted to share this find with you, hoping that you can also derive benefits from it, just as I have.
Elevate your breakfast game with these vibrant and durable cereal boxes wholesale – a perfect blend of freshness and convenience in every morning bite. Make your brand stand out on the shelves with packaging that speaks volumes!
Prototype manufacturing
Experience seamless innovation with our prototype manufacturing services. Our rapid prototyping services ensure swift and precise development, from designing to testing. Trust us to build a prototype that aligns perfectly with your vision and requirements. With our prototyping service, you can bring your ideas to life with efficiency and accuracy. Whether you need to design a prototype from scratch or enhance an existing concept, we're here to help. Partner with us for comprehensive prototype testing to ensure functionality and reliability.
Luxury bathrooms
Elevate your bathroom with luxury design elements and premium materials. Explore our range of MultiPanels and bathroom wall panels for a sleek and modern look. Choose from a variety of bathroom tiles, including marble floor tiles and large bathroom tiles, to create a sophisticated space. Opt for grey floor tiles or beige tiles for a timeless yet contemporary aesthetic. For a touch of elegance, consider black marble tiles to add depth and richness to your bathroom design. Complete the look with SPC flooring for durability and style. Transform your bathroom into a luxurious retreat with our selection of high-quality materials and finishes.
custom cream boxes are tailor-made packaging solutions designed specifically for creams and lotions. These boxes are crafted to accommodate various sizes and shapes of cream containers, ensuring a perfect fit and maximum protection during transportation and display.
Post a Comment